Today I have a cute fancy fold card for you. It is known as a Mini Miura card. I also have a FREE PDF tutorial for you.
Here is one of them OPEN ….

… and this is what it looks like CLOSED

Tips:
- You can make two of these cards from a sheet of 12″ x 12″ cardstock.
- Each card will require 2 pieces of Designer Series Paper 5⅛” x 3¾”.
Instructions:
CARDSTOCK
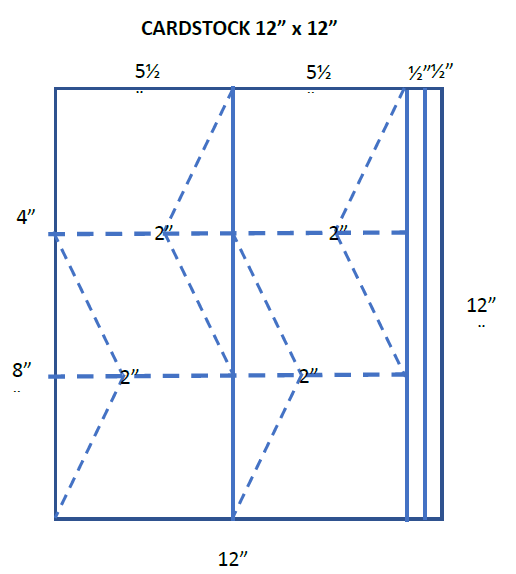
- Cut 2 strips each ½” x 12” along one side. These strips will form the belly bands for the two cards. The remaining piece will be 11” x 12”.
- Score at 4” and 8” along the 12” side so that there are three equal shapes of 4” x 11”
- Along the 11” side, cut at 5½” so that there are two pieces 5½” x 12”
- On the 4” score line, mark a point 2” from the top. Score from the 2” mark to the top edge of the cardstock on both the left and right of the mark.
- On the 8” score line, mark a point 2” from the bottom. Score from the 2” mark to the bottom edge of the cardstock on both the left and right of the mark.
DESIGNER SERIES PAPER
When the card is open, there are three panels. The Designer Series Paper goes on the left panel and the right panel.

Left panel:
- On the right hand side, mark a point 1⅞” from the top. Cut from this point to the top left hand edge.
- Cut ¼” off along the top edge of the small triangle. This piece will be the layer for the belly band.
Right panel:
- On the left hand side, mark a point 1⅞” from the bottom. Cut from this point to the bottom right hand edge.
- Cut ¼” off along the bottom edge of the small triangle. This piece will be the layer for the second belly band.
Assembling the card:
- Burnish all the score lines.
- Fold first horizontal as a mountain fold and second horizontal as a valley fold. This will give a closed trifold look.
- Fold the top diagonal scores as mountain folds – this will push the top of the horizontal fold to a valley.
- Fold the bottom diagonal scores as valley folds – this will push the bottom of the horizontal fold to a mountain.
- Attach Designer Series Paper pieces to left and right panels.
- Decorate centre panel as desired.
- Create a belly band with the ½” x 12” strip ensuring that it is loose enough to slide on and off.
- Attach the small piece of Designer Series Paper on the front of the belly band.
Here are a few more that I have made.

Download the PDF instructions here.
EDITED 2 July 2022. The above instructions and PDF will create 2 cards from a piece of 12″ x 12″ cardstock. If you wish to create a single card using either A4 or Letter size cardstock, download this PDF instead or check out this blog post.


Thank you so much for the link back to my tutorial and your lovely comment. I love your giraffe card and I am sure that your sister will too. 🙂
LikeLike
Thank you Donna. I have a newer version of this card. The above instructions and PDF will create 2 cards from a piece of 12″ x 12″ cardstock. If you wish to create a single card using either A4 or Letter size cardstock, download this PDF instead (https://lavenderthoughts.files.wordpress.com/2022/06/mini-miura-fancy-fold-using-a4-or-letter.pdf) or check out this blog post – https://lavenderthoughts.com/2022/06/12/fun-fold-mini-miura-card/.
You can check out other fun fold cards and tutorials here – https://lavenderthoughts.com/fun-fold-cards/.
Please contact me if you have any queries. Happy stamping,
Annette
LikeLike
I love your tutorials. I will try this card, I love any type of card folds.
Thanks for sharing your talents with us.
Donna
LikeLiked by 1 person